ChromeOS via Chrome device management
ChromeOS devices can be managed remotely from a single dashboard using Google Chrome device management. This requires a Chrome kiosk license per device. If you have not purchased such licenses before, please read the other ChromeOS chapter to see what the options are.
If you decide to roll your own Chrome device management, then read this chapter to find our how to setup your environment so that the SmartSign2Go app gets installed automatically on your ChromeOS devices.
ChromeOS Device Management Background
The ChromeOS device management console is based on a tree structure of organisational units. A configuration of a specific organisational unit will be inherited by all of its children by default. If you like to change specific settings for child-units, then you can simply override them on that specific child-unit.
One of the configurations you can create for an organisational unit, is a device configuration. This configuration will automatically be applied to a device as soon as you place it in that organisational unit or any of the children of that organisational unit. The approach to creating a digital signage player that will automatically start playing your content when you power it on, it to create a device configuration that will start one specific website in single-app mode, also known as "kiosk mode".
For each ChromeOS device that you like to run in kiosk mode you need at least a ChromeOS kiosk license. You can also use a ChromeOS enterprise license, but that has more functionality that you don't need for digital signage purposes and it is more expensive. But the choice is up to you.
Device Configuration For SmartSign2Go Digital Signage
We recommend that you create a dedicated organisational unit for your digital signage playback devices. Let's call that OU.
When that is done, take the following steps:
- Go to Devices > Chrome > Apps & extensions.
- Select he Users & browsers tab and here you do the following:
- On the left, select organisational unit OU for which you like to create this device configuration
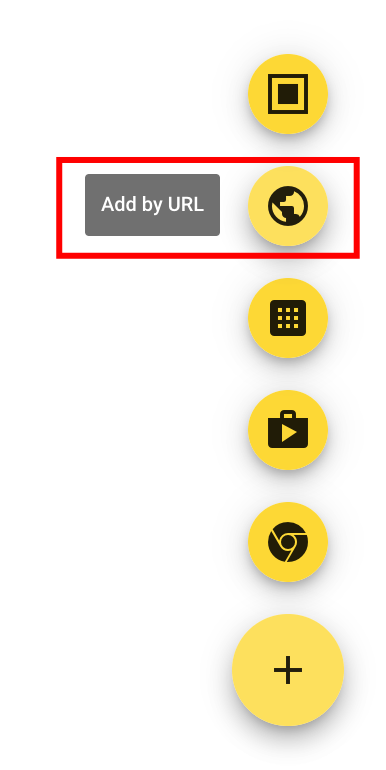
- Set the SmartSign2Go app to be installed by default, by clicking on the bottom right (+) sign and selecting Add by URL (globe icon)
- Enter the URL https://play.playr.biz
- Select Open as a Progressive Web App (PWA) only
- Enter /playthe PWA Manifest ID and click Save
- You should now see the app in the app list. The app is selected and there is an extra settings panel open on the right in which you set the following:
- Under Installation policy, select Force install
- Under Launch on login, select Force launch and prevent closing
- Click Save (in the top right corner).
- If you already had another app configured here, click on each of these apps to open the extra settings and select Block under Installation Policy. You might need to click CLEAR FILTERS on top of the list first, to see all configured apps.
- Next, select the Kiosks tab and do the following:
- Like in the Users & browsers tab, clicking on the bottom right (+) sign and selecting Add by URL (globe icon) to add the SmartSign2Go app
- Enter the URL https://play.playr.biz and click Save
- Agree to the popup
- You should now see the app in the app list. The app is selected and there is an extra settings panel open on the right in which you set the following:
- Under Installation policy, make sure this is set to Installed
- In Kiosk Settings, enable Allow App to Manage Power
- Click Save (in the top right corner).
- In top of the app list, under Auto-launch app, select https://play.playr.biz

- Click Save (in the top right corner).
- Lastly, we need to make sure the screen doesn't go black when we leave the ChromeOS idle / untouched:
- Go to Devices > Chrome > Settings
- Select organisational unit OU that we're configuring
- Select tab Device settings
- Scroll down to section Kiosk power settings
- Click on AC Kiosk power settings
- Under Action on idle, select Do nothing
- In Screen dim timeout in minutes, enter 0
- In Screen off timeout in minutes, enter 0
- Click Save
You're finally done with the base configuration!
Access to local resources
If you plan to show information from "local" resources (services), ie resources on your internal network (office or enterprise LAN, also called "Intranet") then you need to allow access to these resources in the Device Configuration. For security reasons access to resources on your local network has been blocked by default in the Chrome browser since the start of 2026.
To allow Chrome access to local resources (whitelist these resources) take the following steps:
- Go to Devices > Chrome > Settings.
- If applicable select a specific organisational unit
- Select User and browser settings
- Search for LocalNetworkAccessAllowedForUrls
- This will show a list of settings
- Select the Local network access restrictions setting
- On thesetting that opens select Apply restrictions to requests to local network access for Configuration
- Put the URLs for all resources on your local network, one per line, in the first field Allowlist of URL patterns not subject to local network access checks under Configuration
- Click Save
Installing The Actual Chromebox
Installing a Chromebox according to the configuration we just created is now rather simple:
- Enroll the new Chromebox as described here.
- After the enrollment, go to your ChromeOS device management console. You should see the newly enrolled device in the highest organisational unit.
- Select the checkbox in front of the new enrollment and then select Move in the title bar of the device list.
- Find the OU which you configured in the steps above and move the device there.
If all is well, the Chromebox should now install itself startup the digital signage player. You should then see a registration screen with which you can register the device in SmartSign2Go, link a channel and get playback started. If it didn't do this right away, you could try restarting the device manually by pressing the power button.